
Let’s start a Jupyter Notebook instance on the supercomputer cluster and create a tunnel to access it from our local machine. This post is for informative purposes and to get you familiar with the process. The real advantage of a high power cluster is parallel processing, which is out of the scope of this tutorial.
Before we start:
- The process we discuss here can essentially be used for different servers and softwares with/ without some tweaking.
- This process is not the same as multiprocessing. Multiprocessing is a completelely different thing when compared to what we will achieve here.
- Paramshivay is a shared resource, so I clearly mention, that do not abuse it. This post only aims at providing information and highly discourages wastage of resources. Take only as much as you need, and for only the required time.
- If you do not have a account on ParamShivay, get a VM from AWS, GCP or Azure. Also all IIT BHU students can use the institute computing cluster. There will be just one change in the process.
- Windows users should either ditch Windows (XD), or use MobaXterm, I am sorry I can’t help with that.
- I could have shared the actual screenshots of the process, but I do not want to risk getting into action with the administration.
Cluster Structure
I will discuss it very briefly. All the SSH logins on ParamShivay are handled by login nodes. For heavy cpu, gpu requirements there are separate nodes. These compute nodes can only be accessed from the login nodes. So, it is simple then: you login to the cluster (handled by login nodes) and then place your heavy computing jobs on the compute nodes.
This process is fine but not interactive. What we will achieve in this post is real-time computing using Jupyter Notebook and the supercomputing cluster. In simple words, you will be controlling and writing code in the notebook in your local browser window, while the computing will be happening on the cluster.
One time setup
Remember majority of the portion of this tutorial is a one-time set up.
Login to the cluster
Open your terminal and,
$ ssh -x username@server_address
I cannot help you with the login details (username@server_address), they are user and server specific. For IIT (BHU) folks, you can find these details in the emails you receive from the ParamShivay team.
You will be prompted to enter your password and in some cases a human verification might be needed (where you are asked to enter a string as displayed on the screen).
Once you are in the system, you will see something like this:
[arjun.salyan.xxxxxxxx@login4 ~]$
Do you observe that @login4 ? It means that I have logged in to the login node which has name login4. I don’t know how you land up on a particular login node. Maybe they use round robin distribution, but we do not need to worry about it. We will now start setting up our environment.
Check for the module conda, the following command lists all the available modules with conda in their name.
[arjun.salyan.xxxxxxxx@login4 ~]$ module avail conda
You will get a list in the output, search for something like conda-python/X.X. At the time of writing this post, it is conda-python/3.7. Remember this, we will use it at multiple places. Also, this entire tutorial is written keeping the environment conda-python/3.7 in mind.
Now load the conda environment:
[arjun.salyan.xxxxxxxx@login4 ~]$ module load conda-python/3.7
Then install jupyter notebook:
[arjun.salyan.xxxxxxxx@login4 ~]$ pip install notebook --user
Focus on --user you need to pass this because you are not the system administrator.
Now we have the environment ready. Just a few more steps.
Securing our notebook
As I had mentioned, ParamShivay is a shared resource. If you expose a port with Jupyter notebook running on it, anyone can access it. So, to prevent this, we will set a password for our notebook.
Open a python3 shell:
[arjun.salyan.xxxxxxxx@login4 ~]$ python3            # Enter python3
Python 3.7.3 (default, Mar 27 2019, 22:11:17)
[GCC 7.3.0] :: Anaconda, Inc. on linux               # The shell has opened
Type "help", "copyright", "credits" or "license" for more information.
>>> from notebook.auth import passwd; passwd()       # Enter this statement and the passowrd prompt will open
Enter password:
Verify password:
After you verify the password, you will get an output like this:
'sha1:xxxx...xx:xxx...axxx'
Copy it, this is the hashed version of the password you just entered. You can now exit the python shell by entering exit().
Now we need to tell jupyter to use this password.
[arjun.salyan.xxxxxxxx@login4 ~]$ jupyter notebook --generate-config
Writing default config to: /home/arjun.salyan.xxxxxxxx/.jupyter/jupyter_notebook_config.py
The output tells you the path where the file was stored. It will be different for you based on your username. Now, open this file to edit the configuration:
[arjun.salyan.xxxxxxxx@login4 ~]$ vim /home/arjun.salyan.xxxxxxxx/.jupyter/jupyter_notebook_config.py
If this is the first time you are using vim, you will find some strange steps here, but you can do it easily. Once the file opens up, press i (this gives you the ability to INSERT text into the file). Once you can type text into the file, enter this (replace the sha with your own, obtained from above steps and for the port, keep reading):
c.NotebookApp.password = 'sha1:xxxx...xx:xxx...axxx'
c.NotebookApp.port = 17776
DANGER:
You have to realise a few things while setting the port for your notebook:
- Use a non default port (greater than 8888)
- It should be hard to guess.
- It should not be already occupied on that node (this is a guess again, but anything above 8888 should generally be unoccupied, unless you all follow the tutorial blindly and end up using the 17776 port. Yeah, don’t do that)
After you have added the password and port to the file, we need to save it.
- press
ESC(this will kill your powers to insert anything to the file) - type:
:wqand hit enter (w is for write and q is for quit)
Your configurations are ready, only the people who know this password will be able to access the notebook.
Submitting the Job
Remember when I said that computations are not performed on the login node? Yes, you don’t want to put load on the login nodes, for this purpose you have the computation nodes. To place a job on the compute nodes, we write a bash script and then submit it. ParamShivay can then smartly handle the resource requirements based on availability.
Let’s create the file and open it.
[arjun.salyan.xxxxxxxx@login4 ~]$ touch job.sh
[arjun.salyan.xxxxxxxx@login4 ~]$ vim job.sh
Well, you know the drill with vim now. Press i to insert and write this:
#!/bin/sh
#SBATCH -N 1
#SBATCH --ntasks-per-node=1
#SBATCH --job-name=notebook

module load conda-python/3.7
jupyter notebook
Let’s look at what we did in this script.
-Ntells Paramshivay to allocate 1 node to our job. Increase this will not help and might give unexpected results. THe default behaviour of Jupyter or Python is not to handle parallel processing. Multiprocessing is a complex topic and completely out of the scope of this post.--ntasks-per-node=1allocates one CPU core to our process. Increasing this might not help actually. Multiprocessing is not something that will happen by default. In Python we achieve parallel processing by usingiPyParallel, but that would be a complete post of its own. For now, go ahead with this configuration, it is already faster than your personal machine and keeps the load off it.
After you entered the details about your job:
- press
ESC. - type:
:wq.
Great, the job script is ready. All that needs to be done is submit a job.
Whatever we have done so far is a one time task. You won’t need to do this again and again
Finally, submit the job:
[arjun.salyan.xxxxxxxx@login4 ~]$ sbatch job.sh

Job XXXXX submitted.
This XXXXX is the job id and is important. This will help us know if the job has started.
[arjun.salyan.xxxxxxxx@login4 ~]$ scontrol show job XXXXX
You will get all the details about your job. Search for JobState, it should be RUNNING or PENDING. Since we asked for only 8 cores, our task should be in running state pretty quickly.
Once it is in RUNNING state, it will be assigned a compute node. I hope this is making sense, jupyter notebook is now running on that compute node, but only you know the port and password. To find the node, search for NodeList in the output of job info. It would be something like cn017 (it will different/ same and is assigned based on the availability of resources needed by the job). For this tutorial, let us assume that it is running on cn017 (you should replace it with the node where your jub runs).
Great then, jupyter notebook is running on the compute node cn017.
Accessing our notebook
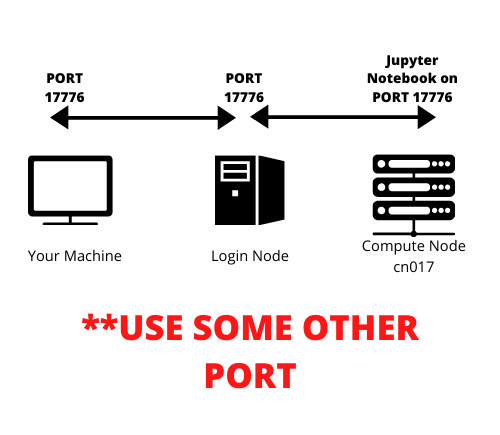
So, now we have an instance of jupyter running. We know where it is running, but how do we access it? It is running on a compute node, but we cannot access the compute node directly, only the login nodes can access the compute nodes.
We will do tunneling. If I try to express in naive terms:
Let’s say we started Jupyter Notebook on port X of the compute node. So, first we will create a tunnel from any port of login node to the port X of the compute node. In this example, let’s say we tunneled port Y of the login node to the port X of the compute node. One step is done.
Second step is to tunnel some port Z of our local machine to that port of login node which is tunneled to port X of compute node. That port in our example is port Y. So we will tunnel the port Z of our machine to the port Y of the login node. This is simple actually, just read once again if it still does not make sense to you.
The port of interest is actually port X of the compute node, rest everything is a method to reach to that port, or a tunnel. After this tunneling is done. Our machine’s port Z will talk to login node’s port Y, which is already talking to the port X of the compute node. Smooth.
See the image, if it helps:
Now log out of ParamShivay, or open a different terminal window:
[arjun.salyan.xxxxxxxx@login4 ~]$ exit
Once you are in your local computer’s terminal, start the tunneling:
$ ssh -L 17776:localhost:17776 arjun.salyan.xxxxxxxx@server_address ssh -L 17776:localhost:17776 cn017
Sample command with the use of X, Y, Z.
# This is a sample command, to elaborate where X, Y and Z go.
$ ssh -L Z:localhost:Y arjun.salyan.xxxxxxxx@server_address ssh -L Y:localhost:X cn017
DANGER:
Remember to use different ports so that the chances of someone else’s also choosing that port are as low as possible. Secondly, remember the X, Y, Z analogy (X is the port of compute node, Y is the port of Login node and Z is your machine’s port); while I used the port 17776 everywhere in the above command, you can change that. Let’s see how this command is working:
ssh -L Z:localhost:Y arjun.salyan.xxxxxxxx@server_addressmaps the portZof our local machine to the portYof a login node.- Then
ssh -L Y:localhost:X cn017maps the portYof login node to the portXof the compute node. - The most important thing here is: jupyter should be running on the port
Xof the selected node andYshould be common, only then you will be able to access that port of login node which is tunneling with the jupyter notebook on the cluster.
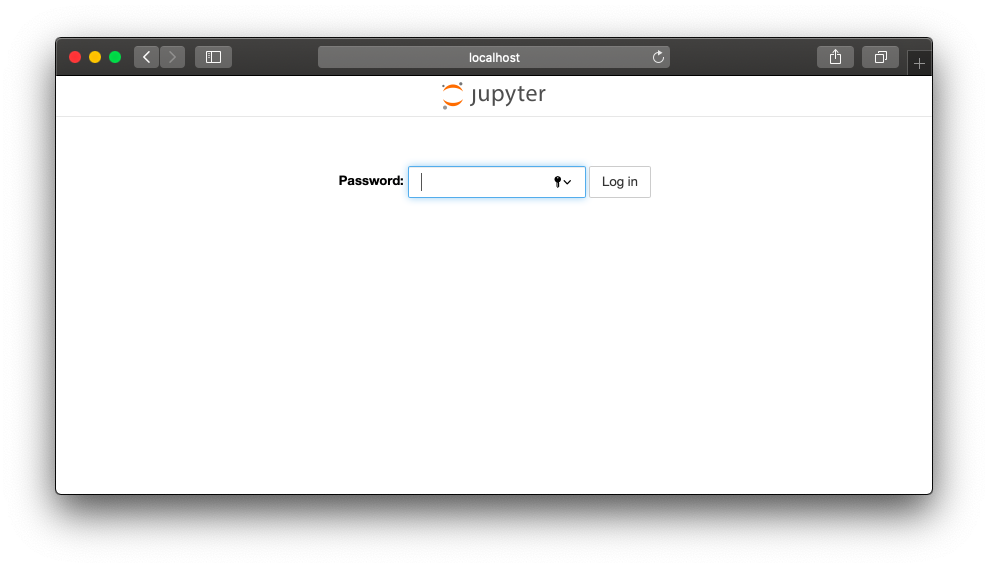
The tunelling should start now, open a browser window and go to localhost:17776 or better localhost:Z. You should see this:
Awesome, you are now accessing the jupyter notebook which is running on a really powerful computer. Your machine is not doing any computation now. The notebook is running in the supercomputer cluster and we are just accessing it using the Internet.
Always Terminate the Job
ONCE YOUR JOB IS DONE, YOU SHOULD END THE PROCESS, so that resources are free to be used by others. In this case there are two ways to terminate the jobs, one is telling Jupyter Notebook to shut down the server and other is the traditional method of terminating the jobs. Both are fine, but one is as simple as a click of the mouse and the other is long. I am sharing both so that if in some case you are locked out of things, you still know how to traditionally cancel the jobs.
-
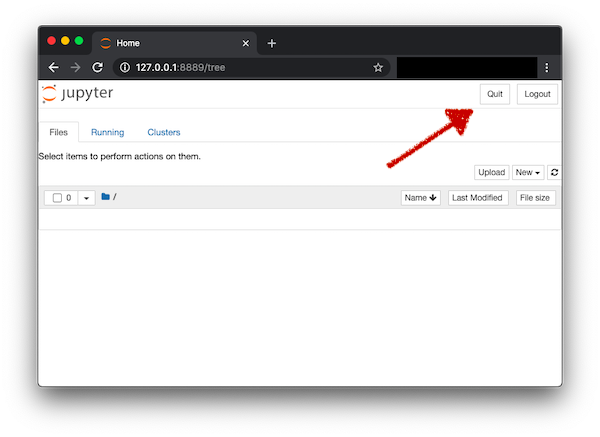
Method 1 (Super easy). Go to the tree view of jupyter (the one where all the files and folders are displayed). In the top right corner you will see a
Quitbutton. Click on it, and that’s it. This terminates the job. As soon as the job is terminated, the port on the compute node is no longer exposed and hence tunneling also terminates automatically.
-
Method 2 (Relatively difficult, but important to know): Once you have completed your work. End the tunneling by pressing
ctrl-Cin the terminal where you initiated the tunneling. This stops the syncing of notebook between your local computer and the cluster, but it does not end the job. Jupyter is still running in Cluster. Login again to the cluster:$ ssh -x username@server_addressThen find your job’s id. If you forgot it, you may find it using
squeue, this will list all the running jobs, then find your job and get it’s id. Then,[arjun.salyan.xxxxxxxx@login4 ~]$ scancel JOB_ID
How to run again from now on?
From now on, running jupyter in this manner will be straightforward. Just four steps:
- Connect to the cluster.
- Submit the job (jupyter and the job script are already configured now) and get the compute node id.
- Start tunneling with the compute node assigned to the job.
And then, the most important step. You tell me?
- Ending the job, once we are done.
Some final remarks:
- In case the port which you selected is already occupied, your job should terminate with an error. You may use the logs of the job to investigate more and then change the port to something else.
- You can now do a lot of things once you understand this flow. You can try to run Jupyter on some other cluster. You may try
ipyparallel. You may try running any other software which exposes a port and can be accessed through terminal. - Do you know that we could have started the Jupyter instance on the login node itself and not submit the job at all? While this would simplify a lot of things, it is not recommended. But in case you want to try it, or have some other single standalone server, then do this: start jupyer on the server port X, and instead of two fold tunneling, just tunnel local computer port Y directly with the server’s port X.
This worked well for me, if you are stuck somewhere please share in the comments below and we will figure a way out. Also, if you find any flaws in the process or have a better way, please help everyone by sharing in the comments below.
Comments